Showing posts with label Fabulous and Fun Fridays. Show all posts

Friday, August 19, 2011

Fabulous & Fun Fridays - How To Make An Art Clock

As I promised last week I am putting the "Fun" back into Fabulous and Fun Fridays!  Today I have prepared a tutorial on how to make an Art Clock,  I definitely had fun doing it and I hope you will too!

What you will need
  • Clock mechanism you can pick up at your local craft store
  • Stretched canvas any shape and size
  • 1 Foam sheet (3 for a $1 at most dollar stores)
  • Your medium of choice, I used Acrylic paints
  • Exacto Knife
  • Pencil
  • Ruler

Start with your blank stretched canvas


Decide on your design and create an image on the stretched canvas using whatever medium you are comfortable with.


Now you need to measure and mark out where the numbers will go on the clock and the perfect center for the clock mechanism to go.  These measurements are crucial for the clock to keep proper time, they need to perfect.


Start with marking the 3, 6, 9 & 12 by finding the perfect center of each side.  You can also mark your perfect center of the canvas now too.  Once the 4 main numbers are marked in you can fill in the rest of the numbers, remember you are only marking them out right now.  You need to have them all marked out before you can actually add them in as you won't be able to get a perfect measurement if you start adding them in before you have marked them all out. 

To figure out the spacing of the rest of the numbers you will measure between the 12 and the 3 and divide that number in 3 whatever that equals is the amount of space you will leave between each number.  For mine the distance between my 12 and 3 is 4.5" so 4.5 divided by 3 equals 1.5 so I will leave 1.5" between each number.  This should be the same all the way around assuming you have measured the 3, 6, 9 & 12 out correctly.   Check that it is the same, if it is not then you may need to go back and correct your initial measurements that are off. 

Once you have marked out all 12 numbers you should start by adding in your 4 main numbers first.  You don't have to actually use numbers on your clock, this is an art clock after all.  I chose to use hearts for mine as you can see below.

Once you have finished your 4 main numbers you are ready to fill in the rest.  I chose to use hot pink gems for the rest of mine.

Once you have finished filling in all 12 numbers you are now ready to prep for the clock mechanism.  This is where your foam sheet is going to work. The clock mechanism is suited for a quarter inch depth and obviously canvas just isn't even close to that so the foam is going to not only make it thicker but also add a bit of support for the mechanism. 


You will only need 1 piece of foam, they come 3 for a dollar at my local dollar store.  Turn your canvas upside down and measure the space inside the frame of your canvas.  Cut the foam approximately 2mm smaller then the space inside the back of the canvas.  The reason for this is if you do not the foam will try to slip underneath the wood frame causing a lump or ridge on the front when you look at it.  By cutting it just a tad bit smaller it won't be able to slip under the wood.  


The foam sheet should lay flat and smooth inside the back of the frame.  There is no need to glue it or anything it will be held in place when we insert our clock mechanism.  Now with an Exacto knife slice a cross in your perfect center of the canvas from the front.  You don't want to make a large hole in fact by slicing a cross it won't even look like a whole from the front. Make sure your slices go all the way through the canvas and the foam sheet behind it.  

You are now ready for your clock mechanism.  It should look like this...
The 4 pieces that I labeled 1 thru 4 come unattached to the rest of the mechanism and I have labeled them in order of how they will assemble to the big piece of the mechanism.  There should be a nut, washer and black foam circle attached to the front of the mechanism, you need to remove them.  Now with those 3 pieces removed you can insert the mechanism into your hole from the back of the canvas. 


With your foam in place push the bolt through the foam and then through the back of the canvas and out the front.  You will now secure it using the 3 pieces that you just removed from it.  Start with the black foam circle, then the washer and then the nut.  Make sure it is tightly secured and that the back of the mechanism is straight and not upside down in the back.  


You are now ready to assemble the clock hands to the front of the mechanism, this is the last step, you are almost finished!  Start by sliding your hour hand (labelled #1 ) down over the bolt, then your minute hand (labelled #2) then tighten the nut (labelled #3) in place. Once the nut is tightly secured in place you can secure the second hand (labelled #4) in place.
Once all your clock hands are securely in place you just need to add a AA battery in the back and set the time using the black dial above the battery.  


Finished Art Clock

Friday, August 12, 2011

Fabulous & Fun Fridays - How To Display Your Art In A Room Setting

After the last few weeks being all work and no play I was honestly prepared to put the fun back into Fabulous & Fun Fridays this week!  Until I had a special request to do a tutorial teaching you how to display your artwork in a room setting without actually photographing it in a room!

It is actually quite easy to do using the free program GIMP.  If you don't have this program on your computer yet you can download it HERE.

First you need to acquire some pictures of rooms with bare wall space to place your art work in.  These pictures are quite easy to obtain and there are different ways of going about it.  You can simply go out with your camera and take some pictures of nice settings that you like or you can find them on the net. Which ever way you choose to obtain your pictures I suggest you build a file folder on your computer to store them in.  I have built a rather large collection of pictures that I have obtained using both methods above and that way I have something to match almost any work that I might want to display.   
*Hint* A great place on the net to obtain these pictures are from a website for a big furniture store as they have lots of photos displaying couches and chairs with blank walls or just white space behind them.  
In my collection I have built up different colored rooms consisting of either black walls, white walls, brick walls, pink walls.  Different color furniture on the different color walls.  Here are a few example below....


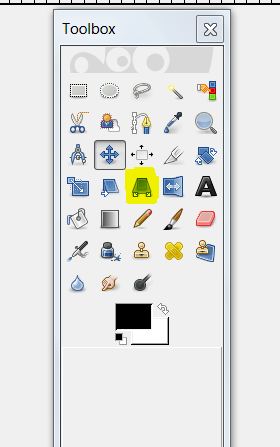
Once you have decided on your setting picture you are going to open it up in GIMP.   Next you will need to open up in a separate GIMP window the art work that you would like to place in the room.  Now click the edit button on the art work window and click copy.  Then go back to your room picture and click paste.   One of 2 things is going to happen now, either the art work is going to be too small for the room or too big.  So you are going to want to scale it to size using the scale layer tool in the GIMP toolbox.  (see image below)
The scale layer tool is highlighted in yellow in the image above

By clicking the scale layer tool you can now simply click on the art work and drag it to size.  I must remind you that your artwork is not yet anchored to the room and so you should be seeing a dotted line around it that is kind of flashing.  You don't want to anchor the artwork until you have it the right size and in the right place, anchoring the artwork is going to be the very last thing you do.

Once you have scaled the artwork to the right size you now need to move it into the right place using the drag tool.  (see image below)
The drag tool is highlighted yellow in the image above
By clicking that drag tool you can then go and click anywhere on the artwork and drag it into place in the room where ever you want it.  Once the artwork is in place and you are happy with it then just click anywhere outside of the artwork in the room and that will anchor the artwork and it will become one with the entire picture.


You may want to show your picture not only in a room but in a frame as well so I will just take a minute to show you that as well.  You can search google images for frames and find hundreds to take your pick from and once you have found one you like all you need to do is familiar yourself with a few tools in GIMP and you will be smooth sailing from there.

As mentioned earlier this is the drag tool and by clicking on it you can then click anywhere on the object that you want to move (assuming it is not anchored down) and drag it anywhere within the picture you are placing it in.

This is the perspective tool and by clicking it it will allow you to then click anywhere on the object that you are placing into another picture and change its perspective based on how it looks inside the other picture.  By dragging its corners in or out accordingly to make it look right.

As mentioned earlier this is the scale layer tool, by clicking this tool you can then click the object that you want to scale and drag it bigger or smaller accordingly.

This is the shear angle tool.  By clicking on this tool you will be able to shear the angles of the picture you are placing into another picture, you will just need to play with it until it looks right.

The frame that I used for this tutorial was a bit too tall and narrow so before I could paste my artwork into it I had to scale layer a little differently then using the scale layer tool. The reason being I didn't want the width and height moving together so what I did was I clicked on layer at the top of the GIMP window then on scale layer, a separate box will open up and show 2 figures, one for width and one for height.  You will see a little link symbol beside the 2 boxes.  When you click that link it will become unlinked and you can then adjust the width and height separately, so what I wanted to do was make the frame shorter and wider.
And below is the painting that I placed in the frame....
In order to do this after I scaled the frame shorter and wider I copied the artwork and pasted it into the frame, then before I anchored it down I used all 4 of the tools I just went over with you above to get it to look like it does above.  There is no step by step way to tell you how to do this as it will be different for everyone.  You simply need to play around with the tools I showed you earlier until you get it right. Once it looks good to you then you can anchor the artwork inside the frame by clicking anywhere on the frame outside of the artwork.  

Once its in the frame I can then stick it into a room easily using the same method I taught you earlier, click copy on the framed artwork and paste it into a room, make the necessary adjustments to make it fit and then anchor it into place.  Keep in mind that the undo button is only a click away when you are doing this.  If you make a mistake or accidently anchor your artwork down prematurely then just click undo and it is like it never happened.

If anyone needs any further assistance with this project feel free to convo me on Etsy anytime and I will be happy to help.  Good luck!!!!

Friday, August 5, 2011

Fabulous & Fun Fridays - How To Sell Art Online

I have been hearing or should I say reading many the complaints lately about wanting to make sales but not making any so today's Fabulous & Fun Fridays Post is going to cover the do's and don'ts of selling art on Etsy/online.

Starting an Etsy Shop can be a wonderful opportunity to reach your audience worldwide, while attracting customers that are interested in what you sell all from your studio or home.  The problem that arises is having the know how to do it correctly!

Today we are going to cover what is the correct way and what is the wrong way so that you can bring in more customers then you scare away.

Develop Your Brand - Building a strong brand is crucial in defining your business and setting yourself a part from the competition. You will need to think about a catchy name, a memorable slogan, an eye appealing logo and even a color scheme.  Then repeat these things in everything you do for your business.  When designing your banner and avatar for your Etsy Shop, your blog, even your FB Fan Page and Twitter if you have one right down to your business cards and packaging of your items, they all need to be consistent across the board with the same name, slogan, logo and color scheme.  You need to make these things your own so when people see those colors and/or your logo they here your catchy name and memorable slogan ringing in their ears!                                                                                                           

When designing your brand you will need to really learn to understand your customer and in doing this sit back and think about who your customer is and what they like, what appeals to them based on what type of people they are.  Are they young, hip and trendy?  Are they retired and conservative?  Are they some where in between?   You need to identify what category your customer falls into and what appeals to them best.

Taking Good Photos - Displaying your art properly can mean the difference between a sale and no sale!  Learning to take great photos is crucial and is going to be worth the extra time you put into it.  Getting yourself a decent camera to start with doesn't cost too much these days, you will need to get yourself a camera with at least a minimum of 8 megapixels or higher.  Then practice practice practice!  Without giving you a full on photo tutorial here I can give you some key points to build off of and they are.....

  • Always use natural light
  • NEVER use a flash!
  • A white background is best 99% of the time
  • Take lots of pics at different angles 
  • Learn to use a photo editing program such as GIMP which is free
  • Crop the image to look its best
  • Adjust the brightness and contrast to optimal levels
  • Use all 5 pics in your Etsy listing showing the item from all angles 
Your customer isn't able to pick up your item and look at it so you have to do your best to give them the same feeling as if they have by showing them pics from all possible angles.  If what your selling can be worn or used for something then showing the customer the item in action is always a good idea as well.  You have to remember that there are hundreds of thousands of people selling their wares on Etsy.  For the most part what ever you are selling someone else is probably selling too and if your pics suck (no offence) the customer is going to go somewhere else.  

Another reason you are going to want to have great pics is because great pics get included in more treasuries and the more treasuries you are included in the more exposure you are getting.  Just because your item is pink and someone is making a pink treasury does not mean they are going to choose your item if the picture is bad.  This is also where white backgrounds are so important.  If you are using lets say a blue background for everything then the only treasuries any of your items will work in are blue ones and you don't want to be included in a treasury because of your background, you want to be included because of your items.  White backgrounds work the best in treasuries and that is just a fact of life.

Marketing Your Art - So many people open an Etsy Shop, list their items and then sit back and wait for the first sale.  That sale 9 out of 10 times does not come and then they are sitting there wondering why.  Don't worry if this is or was you, it is a common mistake that I think most of us made in the beginning.  I call it the "if I list it they will come" syndrome. Well, the bad news is, no they won't come!  Not unless you do a little thing called marketing.  You need to get out there and spread the word about your Etsy Shop and there are so many easy and free ways to do this.  We have an ongoing list right here on our blog that is up to 123 places to promote your Etsy Shop just click HERE to find it.  We are always adding to this list when we come across new places.  You don't need to worry about getting through them all in a day or even a week but its a place to start and work through.  With that many places to promote your shop there is no reason to have to pay for marketing.  With that being said it is going to be a lot of your time spent getting out there and promoting yourself but the only other alternative is forking out the dough to pay for marketing, it's your choice really but you have to choose one or the other.  Your shop isn't going to market its self!

Building Rapport - If you have done all of the above then eventually they will come, oh yes you will start to get customers!  What you do with your customers are crucial for a couple of reasons.  You will want to create repeat business and you will want your customers to speak highly of you because word of mouth is the absolute best marketing you can get.  

Rapport is defined as A close and harmonious relationship in which the people or groups concerned understand each other's feelings or ideas and communicate well.

This is exactly why building rapport with your customers is crucial.  You will want to understand your customers wants and needs and your customers will want to trust in you.  You may be wondering how you can do this and it is actually quite easy.  To start you will want to always be honest with your customers that is number one! The second thing is you will want to build a relationship with your customers and the easiest way of doing this is through blogging believe it or not.  Blogging allows you to build up a following to whom you can communicate your art be it your finished pieces or pieces in progress.  In doing so they get to know you as a person, as a friend and in turn start to trust you like they would a friend.  The key is to maintain this trust which means you treat them just like a friend as well.  Simple things like sending them a Happy Birthday or Happy Anniversary, you can even send out coupons or coupon codes.  Customers will take notice of these little things

Shipping your Art - Taking pride in your shipping is very important.  Keeping up with shipping dates and proper packaging can mean the difference between repeat business or not.  If you tell a customer that you will ship out by a certain date then you need to make it happen.  Do not leave your customers hanging in the dark not knowing if something has been shipped out so always  make sure to send out confirmations.  Etsy makes it easy to go back to a sale and mark it as shipped and so does paypal as long as you are sure to mark both places as shipped then sending an extra note of confirmation is your choice but it does show good customer service to do.  It is important to get stuff out in a timely fashion as well. If a customer makes a purchase from you they are going to be excited to receive it, don't make them wait a month.  Always do your best to investigate shipments that don't arrive.  Do not make it not your responsibility because if you do that you have just lost yourself both the repeat customer and word of mouth marketing!  

The other half of the shipping part is packaging.  Packaging is so important for a couple of reasons, one you want it to look nice and two you want to be safe.  Never assume that the post office is going to be careful with your item.  If the item can't bent then be sure to put cardboard on either side of it.  If the item can't get wet be sure to wrap it in plastic and tape the envelope up good.  If the item can't get broken then be sure to wrap it up good in bubble wrap and lots of cushioning.   While doing all of this you need to make sure that the packaging looks neat, tidy and professional while staying consistent with your branding.

Customer Feedback - Listening to what your customers are saying is oh so important.  Whether it be positive or negative you need to listen.  You definitely want to do everything in your power to avoid getting negative feedback but if it happens then you will want to concern yourself with why and make every effort to sort out the issue.  Sometimes you can learn a lot from customer feedback that you would not have learned any other ways.  Customer feedback can come in more forms then just the one kind on Etsy.  It  happens when your customers leave comments on your blog and on your FB Fan Page as well.  They may be telling you what they want to see or what they don't want to see and you should be taking note.  Don't ignore the feedback as this is crucial in learning about what your customers are interested in and in turn want to buy.  Keeping an open mind and having a willingness to change are key when dealing with customer feedback.

This all may sound like a lot of work but no one said that opening your own business was going to be easy.  Just know that with all of this hard work comes big rewards and once you start making sales and successfully selling your art online you will be thankful you invested all of the hard work and time. 

Happy Sales!!!!!

Thursday, July 28, 2011

Fabulous & Fun Fridays - Twitter 101

After being at much of a loss of what to do for Fabulous & Fun Fridays this week, I was given a great idea from a friend and fellow Etsian Artist member.  Last week I opened up a Twitter Account for our Etsian Artists Team and since then have been out promoting it around in an effort to gain followers for the greater good of this team.  During such time it was brought to my attention that there are members of this team that all though they would like to follow along, they can't!  Why?  Because they don't have a Twitter account and do not know how to use it.  

I had forgotten just how scary and foreign Twitter was when I first opened my account.  Now that I am sitting here thinking about it, I am remembering just how confused and overwhelmed I really was in the beginning.  Wishing that I had someone to show me the ropes!  I will tell you what though, as overwhelming as it seems in the beginning, once you get the hang of it, you will be sailing off totally forgetting that there was ever a time that you didn't get it!  Which is where I am at now, and why the thought never ever crossed my mind that this would be a good topic for Friday.

Lets start with the basics..... What is Twitter anyhow?  Twitter is a network comprised of information in the form of a "Tweet"  What is a "Tweet?"  A Tweet is information given in 140 characters or less.   Everything on Twitter, whether you are posting a status update or filling out your bio on your profile, is 140 characters or less.  I would say that that is probably the hardest part about Twitter to get use to.

Basically when you learn Twitter, you are going to have to learn a new language.  This language consists of short forms instead of whole words, hashtags (#) and mentions (@).  
  • Hashtags are basically like a tag on Etsy only they are words that start with a # symbol.  So for example if you were to tweet your new listing on Etsy for an ACEO card you just created you might add the hashtag #ACEO to your tweet so that your tweet will appear to anyone searching that hashtag.  Twitter always gives you a list updated daily of the most popular hashtags so it is smart to pay attention to this list and use them in your tweets to gain more visibility.
  • Mentions are usernames starting with the @ symbol.  Facebook has now adopted this method so many people might already be familiar with this from FB and not even realize it.  So if you want to direct your tweet to a certain person  then you would include their Twitter username beginning with the @ symbol and they will receive that tweet in their timeline.  You can include multiple @mentions in a single tweet.
As for the short forms, this is something you will have to learn as you go as I can't possibly list them all here. lol  If any of you are fans of texting then you may already know quite a few and they do just carry over to Twitter.  Some common examples are...
  • ttys = talk to you soon
  • brb = be right back
  • ab/abt = about
  • b/c =  because
  • bfn = Bye for now
  • cre8 = create
  • em =  email
  • ema = email address
  • fab = fabulous
  • prt = please retweet
  • rt = retweet
  • twewbie = anyone who is using this blog post a twitter newbie
Here is an excellent Twitter Dictionary with over 130 Twitter abbreviations, words, phrases and tools to get you going.

Now you may still be wondering why the need to even learn this new and confusing language, I mean you've been living for this long with out it just fine, right!? Wrong!  You just don't even yet know what you've been missing.  Especially if you are a member of the Etsian Artists Team that means you own an Etsy Shop, which means that you are always looking for new ways to promote and network.  Twitter is easy once you get the hang of it.  It is also FREE! There are millions of people on Twitter some of which are bound to like what you do, maybe even enough to want to buy it!

The trick to using Twitter successfully for your Etsy business is to learn to use it in a meaningful way.  The worst thing you can do is appear like a robot with no emotion, just tweeting out your new listing every time you list a new item on Etsy.  Think of Twitter like a room full of people, it's a really big room with A LOT of people in it.  Everyone is connecting through little conversations here and there, sharing information with each other in a meaningful way.  You don't want to be that guy or gal that just walks into the room and starts shouting out "hey look at me, I just listed a new art card on Etsy!  Look at it!!!"  and then you disappear and tomorrow you walk back into that room and you do it again, yelling the exact same thing in a different color.  This is the fastest way to get ignored and to lose followers!  Don't worry though, you will get a chance to share your new listings, you just need to learn how to do it right.

When it comes down to it, if you want people to look at what you got, then you have to be willing to look at what they've got.  If you put in a little time, you WILL reap the rewards.  The easiest way to do this is to work Twitter into your daily routine.  I assume most of us are the same in the way that we check our email, our Etsy shops, our blogs, our team and our FB's  all on a daily basis, now you just need to add Twitter to that list too.  When you log onto your twitter account and you are looking at your homepage, you are looking at a timeline.  A timeline shows you whats going on with all of the people that you are following.  Just as what is going on with you will show up in the timelines of whom ever is following you.  It is important to follow people that interest you, this is what will help to make Twitter a useful tool that works for you.  For example, if you do not know a single thing about sports and nor do you care, then a sports caster is not exactly the type of person that you are going to want to follow.  However if you are an abstract artist and that sports caster enjoys abstract art then he might want to follow you.  This doesn't mean that you are obligated to follow him back.  I do realize that there is controversy on this subject so I guess this is a matter of opinion.  There are many people out there that will follow anybody and everybody,  the you follow me and I will follow you, regardless of whether or not you interest me types.  However I do follow every other Etsy shop that follows me and even the ones that don't.  That is the only circumstance where I do become the 'you follow me and I will follow you type' lol But that is because Etsy intersts me! Outside of Etsy then I am mainly just following anything art related or the random occasional Twitterer that seems interesting to me.  I have had many the sportscasters follow me but I don't follow them back.  I don't think this is rude nor do I think that it is considered to be rude.  This is how Twitter works and that is what keeps it working properly for people.  If your timeline gets crowded full of stuff that doesn't interest you then it no longer becomes fun or interesting and you are no longer giving it any attention and it has then at that point failed as a tool.  This is why following people that interest you only is so important!

Back to your homepage and timelines.  When  you look through your timeline it is important to look at stuff, click on stuff and share stuff.  For example, I have a few followers that I also follow them back.  These followers are very kind and quite often, pretty much daily they retweet my tweets.  This means they have taken something I tweeted and shared it with all of their followers.  So I will return the favor.  When I look through my timeline I will not only look for stuff that seems interesting to me but also for tweets from those key followers so that I can retweet their tweets in return.  It is also proper etiquette to reply a thank you to those that have retweeted your tweets.

You may be wondering now how you will know if your tweets have been retweeted.  When you are logged into your homepage there are several tabs, the one right next to timeline is @mentions and then retweets is next.  If you click on the @mentions tab this will show you all the tweets that you are mentioned in.  The retweets tab is a bit more complicated.  Under this tab there are 3 categories of retweets that you can view.  
  • Retweets by others = People that you follow have retweeted tweets from people they follow.  These tweets might not necessarily have anything to do with you but the people that you follow have found them interesting enough to retweet so you might in turn think that they are interesting.
  • Retweets by you = This will show you all the tweets that you retweeted. Easy
  • Your Tweets Retweeted = This will show you who has been retweeting your tweets.  This is good to pay attention to because you will want to go down the list and give a reply of thank you, you need to atleast acknowledge that it happened or they may not bother to do it anymore.  This is something that is good for you, especially if it is your Etsy items and shop that they are retweeting.  For any example I have 431 followers but one of those followers who retweets everything I post has 6000 followers so even though I only have 431 followers, I can be sure that everything I tweet is being seen by over 6000 followers thanks to a very kind follower of mine.  So I make sure that I thank this person everytime as this is a huge benefit to me!
The next 2 tabs on your homepage are search and lists.  The search tab will not show you any information until you start saving your searches.  So if there is a popular subject that you search quite often you might want to save this search so that instead of typing it in the search bar everyday you can simply click on it under the search tab of your homepage and have instant access to the results.

Lists are a bit more complicated.  Your 2 options under Lists is Lists you created and Lists following you.  You can create lists to organize who you follow.  For example you might create a list of all the Etsy Shops that you follow so that when you view your timeline all of the Etsy shops will only show up under your list.  You could potentially list all of the people you follow if you were really organized.  Lists can be private or public.  If a list is public then you can follow other peoples lists.  If they are private then you can't.  If you want to be removed from a list then you can remove yourself by blocking the creator of the list.
Click HERE for full detailed instructions on how to use Twitter Lists.

To take even further advantage of Twitter you can even connect it to your other social networking sites such as FB, Blogger and Flickr just to name a few so that everything you do on those sites automatically post to your Twitter page.  If you are not automatically connected most sites give you the option to share on Twitter anyhow.  If you blog you have probably seen the share options at the bottom of every blog post on Blogger and one of those options is the big blue T for Twitter.  Just click that button and it will bring up your tweet already to go unless you want to add any hashtags or @mentions to it.  

If you are on Etsy and you Tweet then you should positively start following @handmadebot and once you do then you can add the #handmadebot hashtag to all of your Etsy related tweets and once you do that handmadebot will automatically retweet your tweet to thousands of people in the handmade community.  There use to be one called Etsybot that did the same but I have noticed that it stopped retweeting mine and others tweets so I'm not sure what happened to that one. If anyone knows, please enlighten me.  

I think this should be enough to get you started on Twitter.  Once you are signed up go to this discussion in our Team Forum to share your Twitter accounts so we can all follow each other.  I hope this tutorial is helpful to those not yet familiarized with Twitter and I look forward to following you and reading your tweets soon!

Friday, July 22, 2011

Fabulous & Fun Fridays - How To Make Your Photos Pop


All artists that aren't photographers will come to find out at some point or another that photographing their art isn't as easy as one might think.  There is a lot to learn in order to get that perfect shot where your art looks in the photo exactly as it does in real life, let alone good enough quality to make prints with.

This tutorial is going to go more in depth with what to do with your photo once you have taken it.  However I will go over some basic pointers for you to keep in mind when you go to take the pictures.

  • Natural Lighting - I can't stress this point enough!  You don't want to be in  direct bright sunlight, you just want natural light and it doesn't even have to be a lot of it.  A large window in your house or even if you can get outside to take the shot is the best.  
  • White Background - I have found the easiest way to achieve a perfectly white background every time is to use a large piece of white foam board that you can lean your art against to take the picture.  These are easily accessible at any dollar store or craft store, they're cheap and portable.
  • Good Camera - As an artist myself I know that most of us don't have a lot of extra dough floating around to go out and by the Canon Rebel or anything but a decent camera with lots of megapixels is not overly expensive these days.  You can pick up a Kodak 14 Megapixel digital camera for under $100 and many more like it in the same price range.  I think for the most part this is common knowledge but I will say it anyhow, the more megapixels your shooting with, the better your picture will be, bottom line!
  • Tripod - If you are serious about being an artist then this is necessary.  You can pick up a great tripod for $20 and if you want to go all out then you can get even better ones for more money.  I have a $20 one and it has never done me wrong and even has the added features like a compass and levels.  Using the tripod will eliminate the problem of camera shake which causes your photo to turn out blurry.  Even if its just a little bit of blur it is no good when it comes to photographing your art, especially if you want to make prints with these photos!
  • Macro Setting - Familiarize yourself with the functions of your digital camera and you will come across the macro setting which is usually symbolized by a little flower on most cameras.  The macro setting is only to be turned on when you are taking a very close shot of great detail.  How close you need to be to your subject varies with each camera so you will need to check your manual.  This setting is almost like a magnifying glass and allows you to capture incredible detail within your subject however if you are too far away your shot will be out of focus.
  • Turn Flash OFF - This is SO important!!!!  Never use a flash when photographing your art!  This goes along with the first point of using natural light only.  If you are in the house and there isn't enough natural light your photos may be turning out kind of yellowy,  this leads beginners to feel the urge to turn on their flash.  I am telling you that it will only make things worst, just DON't DO IT!!!


Those are some basic guidelines to get you started.  Keep practicing and you find that your pics will only get better with time and practice.  However taking a good photo is only half of it, the rest of the task is done on the computer once you have uploaded all of your unedited pics.


The method that I use for this is actually quite simple and I even use a free program called GIMP!  If you do not have GIMP installed on your computer yet you can download it here http://www.gimp.org/downloads/.  The download is 100% safe and like I already said FREE!  To follow along with this tutorial you will need this program as I can't guarantee that it will be exactly the same in other programs. 

Your going to want to start with a photo that you have taken in natural sunlight and isn't blurry, this is the only criteria you need to make this method work.  It won't matter if the photo is a bit crooked as we will fix that along the way here as well.

Here is a before and after of what you will learn today, as you can see in the before photo, it is a bit crooked so you wouldn't be able to crop it straight with out cutting off a bit of the painting, or can you?  Besides that the lighting is terrible despite being taken in natural sunlight.  Natural sunlight won't always give us perfect lighting in our photos right off the bat but it will give us something that can easily be worked with.  Looking at the after photo you will see that it has been cropped, straight, we haven't loss any of the painting at the edges and the lighting has been fixed up so that the painting looks like it does in real life.

BEFORE


AFTER

What you will need for this tutorial:

  • A  photo of your product taken in natural sunlight
  • The free program GIMP

Everything that I describe and show you in the diagrams below has been highlighted in yellow and marked with a red arrow so you won't be able to miss it.  Ok, lets get started...

We need to get this ACEO straightened out in the photo and to do that we will use the rotate button.  Click on rotate and then use your mouse to click on the corner of what you want to rotate and drag it into place.


In this image you will see that the ACEO has been rotated into place and now all you have to do is click the rotate button in the little box that comes up to make it stick.


Now we need to crop the photo so that we are left with nothing but what we actually want to have in our final photo.  So using the crop button, when you click on it your mouse will turn into a cross which you can click anywhere in the photo that you want to start your crop and drag your box around the object in the photo, if it doesn't drag perfectly that is ok because you can play with it after the fact by moving the sides of the box in and out.  Once you have the box perfectly around the object that you are cropping just double click in the middle of it and that will complete your crop.  Remember, you want to get all of the sides evenly as close the art as possible without actually touching the art.


Once you have completed your crop it might look something like this image below especially if you are working with art.  As you can see in the image below, the perspective is a bit off so I was not able to get a perfect crop around the ACEO without either cutting some of the edge off or having extra space around it unevenly in different spots.  You don't ever want to cut off any of your art so just bring the crop box as close to the edge where you can and leave the extra space in the other spots. Now to get rid of that extra space we will use the perspective tool. 


Click on the perspective tool in the tool box and then use your mouse to drag the corners of your art out until they fill the box.  Your art will be outlined in a dotted yellow line so you can easily see how far you need to drag the corners out until they meet the edge. Now your dotted yellow line and the extra space is now outside of your image.  Once you have it all fixed up you can click on the transform button in the box that came up and it will stick.  Now to complete this task we will need crop the image again just to completely eliminate that extra space.


As you can see by the image below that extra space is now highlighted in the yellow dotted line around your image and you can get rid of it by clicking on the crop button and cropping out only your item.  You will only be able to drag your crop box as far as your good image so just drag the box around your image and then pull all 4 edges over as far as they will go to ensure you don't cut off any of your good picture.  


Once you have dragged them all the way to the edges double click in the middle and you will be left with only your perfectly straight picture.


Now we need to adjust the lighting and get this picture to look exactly or as close to the original painting as we can.  There are 2 ways that we can do this, and how complicated the lighting in your picture is, is how you can determine which method you should use.

The first method I will show you only gives you 2 values to adjust, your brightness and your contrast (light and dark).  I find that the result is a bit harsher with this method as there is no in between.  However if the lighting in your picture is very close to the original in real life then this method will probably do you just fine. To do this click on the colors tab at the top of the program and then in the drop down menu that appears click on Brightness and Contrast.  You will see a new box come up titled Brightness - Contrast.


Starting with the brightness tab drag the bar over to the right, there is no exact measurement for this, you will just have to play around with it until it looks right.  It won't really look right though until you adjust the contrast below so what I like to do is pull it over about 3/4 of the way to the right and then start adjusting the contrast until it starts to look right.  Looking at the real life art next to you while you do this will help you to get it as close to life like as possible.  Don't be afraid to play around with these 2 values until it is perfect.  If you find that it gets too far off and you need to start over, just click the reset button at the bottom of the box.  When you are happy with it click the ok button to make it stick.  See the next 2 images for my examples of how to do this.


The second method is done by using the Levels tool which is also found in the colors menu as shown below.


This box may look a little more complicated if you are unfamiliar with this tool but it really isn't.  You are only going to be adjusting your Input Levels at the top, which is really only one more value and that is your mid tones which were missing in the first method.  You can do this in a very similar fashion as you did with the Brightness and Contrast only this time you have 3 values to work with instead of only 2.  It is very easy to remember which is which because the arrows are color coded in case you ever forget.  You should start with the white arrow which is furthest to the right.


Start sliding the white arrow to the left and as you do you will see your middle mid tones arrow sliding left as well.  That is ok because you can still adjust it separately after.  Once you see the lightness starting to look close to what you want you can start adjusting the dark and mid tones.


You will see that when you move the black arrow that is furthest to the left and which controls your dark levels that the mid tones arrow in the middle will also move with it just like it did for the light arrow.  However when you move the mid tones arrow only it will move by itself.   So knowing all of this you can now play around with the 3 arrows until your painting looks the same as it does in real life.  Once you have all of your levels how you want them just click ok at the bottom of the box.


Now your picture should be done at this point, however I am going to show you one more option which will be handy for posting your art to the internet.  If you have used a high megapixel camera then your photo will be high resolution and if you upload this to the internet you are making it very easy for theft.  Not to mention there are some sites that have size restrictions. 

So you can adjust your size by clicking on the layers tab and selecting Scale Layer from the drop down menu.  I find that 1000 px works best for most sites and is small enough that you don't need to worry about theft.  A box will come up like the one below choose the bigger number and change it to 1000 px, the other number will change on its own to correspond with the proper proportion.   If you ever don't want the numbers to change together for whatever reason you can easily click on the little link button beside the number boxes and when you click on that it will break the link so that you can adjust both numbers separately but for art it is generally better to leave them linked together as to keep the proper proportion.  

Once you get them adjusted click the scale button and your image will change size.  Now you will need to adjust the canvas size around your image or you will be left with a white box around it.


To adjust the canvas size click on image which is right beside the layer menu and then click on Fit Canvas To Layers and this will complete your picture.


Your final picture should look something like the one below which is ready to be saved and uploaded to the website of your choice.


AFTER